Doom Fire is an animated fire used by some ports of Doom, and documented in Fabien Sanglard's blogpost. Despite the animation looking cool, the code is simple and ideal for learning graphic APIs.
The Offscreen Canvas API allows for moving the animation code to a Worker, allowing the main thread to worry about more important things - like handling user input! I've been looking into trying out the API for a while and the Doom Fire animation sounded simple enough to allow focusing on how Offscreen Canvas works.
This post will focus on the Offscreen Canvas and modern JavaScript aspects for the code. I do recommend Fabien's blogpost if you just want to learn more about the animation or go straight to the source code.
Browser support
As most modern APIs, it's a good idea to start the work by checking browser support. The
Offscreen Canvas API has good support and includes Chrome, Samsung Internet, Edge, and
a couple other browsers. But it's still missing in Safari and Firefox. Update: Since 2023, Offscreen Canvas is supported by all major browsers and a Baseline feature.
Thankfully, the API is easy to feature test:
const canvas = document.querySelector('#canvas');
if ("OffscreenCanvas" in window) {
  // Offscreen Canvas code goes here!
}
Architecture considerations
Since Offscreen Canvas is not supported by all browsers, we'll want to use
progressive enhancement and use the API when it is available - this means that the animation
will run on a worker thread when Offscreen Canvas is available and on the main thread when it isn't.
With this information, we now know we have to decouple the code that runs the animation from the code that sets up the Canvas and add it to a module that can be used from the main thread or from the worker:
  export default class DoomFireAnimation {
    constructor(parent, canvas) {
      this.parent = parent;
      this.canvas = canvas;
      this.ctx = canvas.getContext('2d');
      ... // Finish setting up the animation.
    }

    start() {
      this.parent.requestAnimationFrame(this._update.bind(this));
    }

    _update() {
      ...
      // Run the Doom Fire animation then render the next frame.
      this.parent.requestAnimationFrame(this._update.bind(this));
    }
  }
In the snippet above, the constructor gets two variables:
- A reference to the context where the code is running, so we can call
requestAnimationFrame()to render each frame. This will either be theWindowobject when the animation is running on the main thread or theWorkerobject when running off the main thread. - A reference to the
Canvasobject that we will used to draw the animation.
The Worker implementation is straightforward:
import DoomFireAnimation from './doom-fire-animation.mjs';

let doomFireAnimation;

self.onmessage = function(ev) {
  if(ev.data.msg === 'init') {
    doomFireAnimation = new DoomFireAnimation(self, ev.data.canvas);
  }

  if (ev.data.msg === 'start') {
    if (doomFireAnimation) {
      doomFireAnimation.toggle().start();
    }
  }
}
The Worker can handle two types of messages: one to prepare the animation and another message
that starts it. Those messages could be merged into a single one, but having separate
events comes handy when wrapping the animation into a web component.
Finally, we can put everything together in the application:
const canvas = document.querySelector('#canvas');
if ("OffscreenCanvas" in window) {
  const offscreenCanvas = this.canvas.transferControlToOffscreen();
  this.worker = new Worker('doom-fire-worker.js');
  this.worker.postMessage(
    {msg: 'init', canvas: offscreenCanvas}, [offscreenCanvas]
  );
  this.worker.postMessage({msg: 'start'});
} else {
  this.animation = new DoomFireAnimation(window, this.canvas);
  this.animation.start();
}
When Offscreen Canvas is available, transferControlToOffscreen() transfers control of the canvas
and then is passed to a Worker. We then send an init message with a reference to the
Offscreen Canvas and start the animation.
When not available, the DoomFireAnimation is created in the main thread, with a reference to the
Window object and the canvas.
Wrapping everything in a Web Component
export default class DoomFire extends HTMLElement {
  constructor() {
    super();

    // Create our own Canvas!
    this.canvas = document.createElement('canvas');
    this.offscreen = "OffscreenCanvas" in window;

    // Make the canvas use the whole element.
    this.canvas.style.width = '100%';
    this.canvas.style.height = '100%';

    if (this.offscreen) {
      console.log('Rendering with Offscreen Canvas.');
      const offscreenCanvas = this.canvas.transferControlToOffscreen();
      this.worker = new Worker('doom-fire-worker.js');
      this.worker.postMessage(
        {msg: 'init', canvas: offscreenCanvas}, [offscreenCanvas]
      );
    } else {
      console.log('Rendering with regular Canvas.');
      this.animation = new DoomFireAnimation(window, this.canvas);
    }

    const shadowRoot = this.attachShadow({mode: 'open'});
    shadowRoot.appendChild(this.canvas);
  }

  connectedCallback() {
    if (this.offscreen) {
      this.worker.postMessage({msg: 'start'});
    } else {
      this.animation.start();
    }
  }
}

if (!customElements.get('doom-fire')) {
  customElements.define('doom-fire', DoomFire);
}
And this is how the module can be added to the HTML:
<!doctype html>
<head>
  ...
  <script type="module" src="doom-fire.mjs">
  ...
</head>
<body>
  <doom-fire></doom-fire>
</body>
Performance
The Doom Fire animation is lightweight enough to run without effort in most devices, as it was originally created to run on devices like the PSX and the Nintendo 64.
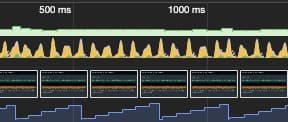
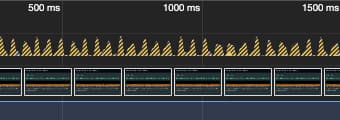
Still, checking out the fire charts on DevTools (pun intended) shows us how free the main thread gets with Offscreen Canvas:
| Main Thread | Offscreen Canvas |
|---|---|
 |  |
Where to go next
If you are a fan of the Canvas 2D API, you may be interested to know that it is getting updates and improvements! Check out the recent Chrome Dev Summit by Aaron Krajeski talk to learn more!
Comments
No comments yet. Be the first to comment!
Leave a comment
Comments are moderated and may take some time to appear.