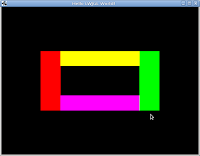
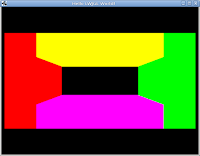
Until now, all our examples were done using the orthographic mode. This means that we haven't seen any example that gives us a sense of depth. Ortographic mode is actually very useful if you want to make 2D games in OpenGL or draw a HUD for your game. But what most developers really want is to make 3D games, with an awesome sense of depth.
The 2 images below picture the same scene rendered in orthographic mode, and then in perspective mode.


For this example, i've included the same scene rendered in orthographic and perspective mode. Check the examples on the example6 package of the source. I won't detail the ortographic mode example, because its not much different from previous examples.
The only new class in this example is the GLFrustrum class. Its just a simple wrapper that manipulates the projection matrix with some utility methods. The relevant method for this example is setPerspective method. The image below helps to understand the parameter values. The first parameter is the field of view, followed by the aspect ratio, and then by the value of the near plane and then the far plane.
So, using the GLFrustrum is the first difference in this example. The other on is that we have another MatrixStack declared, the perspective matrix. It is build from the GLFrustrum matrix and should be changed everytime he values in the GLFrustrum change. This is how the initGL method looks like now.
public void initGL() {
    glClearColor(0.0f,0.0f,0.0f,0.0f);

    shader = GLShaderFactory.getFlatShader();

    sideWall = GLBatchFactory.makeCube(0.2f, 0.8f, 1.0f);
    topWall = GLBatchFactory.makeCube(0.8f, 0.2f, 1.0f);

    frustrum = new GLFrustrum();
    modelViewMatrix = new MatrixStack();
}
And this is how the resizeGL method looks like:
public void resizeGL() {
    glViewport(0,0,Display.getWidth() ,Display.getHeight());
    frustrum.setPerspective(45f, Display.getWidth()/ Display.getHeight(), 1.0f, 10.0f);
    projectionMatrix = new MatrixStack(frustrum.getProjectionMatrix());
}
The change in the initGL method is straightforward. The significant change (besides initalizing scene specific stuff) is the addition of the code creating the GLFrustrum. But the resizeGL method packs more interesting stuff. besides calling glViewPort, it configures a 45 degree fov for the frustrum, with near plane of 1.0 and far plane of 10.0, which means that anything outside those points wont be drawed.
The code for drawing the scene is also straightforward. This time, we need to multiply the ModelView matrix by the ProjectionMatrix so as to get the projected scene. The other change you should notice is that when translating the objects in the scene, we use a -2 on the Z axis. Thats related to the configuration of the near and far plane we mentioned before.
So, that's it for drawing a projected scene! Again, all the code is available at http://code.google.com/p/opengl-superbible-java/
Comments
No comments yet. Be the first to comment!
Leave a comment
Comments are moderated and may take some time to appear.